| << Previous Page << | >> Next Page >> |
 Your inventory menu can be opened with a bound key (be sure to set this
in the Night's Edge preferences menu). Once open, it will show you every
piece of equipment you are currently carrying. If you are carrying more
items than fit on the screen, the menu will display arrows at the top and
bottom, indicating that you can scroll up and down.
Your inventory menu can be opened with a bound key (be sure to set this
in the Night's Edge preferences menu). Once open, it will show you every
piece of equipment you are currently carrying. If you are carrying more
items than fit on the screen, the menu will display arrows at the top and
bottom, indicating that you can scroll up and down.
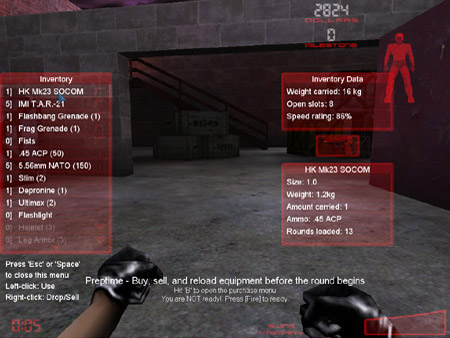
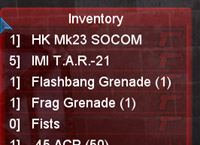
Equipment will be grouped by type, and each starts with a number in front of a square bracket. This number indicates how many inventory spaces the item (or items) occupy. Weapons will show first, designated by the small gun icon on the right edge of the menu slot. Then your stock of ammunition will be shown, with the count of each ammo type in parentheses after the name. Ammo can be identified by the bullet icon. Any gear you are carrying will be shown next, with a wrench to identify them. Finally, armor is listed with an armor icon.
On the right side of the screen, you'll see a display for "Inventory Data". This can be an important tool in managing your possessions properly. Since you can only carry a limited amount of gear, the number of open inventory spaces can help in planning future purchases. The speed rating lets you know how much your weight carried is affecting your ability to run in the game. Below this section is the equipment info window that opens when you examine your carried items. Holding the mouse over a piece of equipment will display specific info about that item, and for weapons it will also tell you what kind of ammo it uses, as well as how many rounds are loaded.
The inventory menu isn't just for show, players can also use it to manage their arsenal. Left-clicking on any weapon will tell the game to switch to that weapon. Similarly, left-clicking on a piece of gear (stim packs, binoculars, etc.) will attempt to use that item if it has an active use. Right-clicking during a game will drop whatever piece of equipment the mouse cursor is over. During preptime, though, right-clicking will sell the specified item.
Armor is grayed out in the inventory menu because it can neither be "used" nor dropped while a round is underway. It can be sold during preptime though.
| << Previous Page << | [10] | >> Next Page >> |