So, you want to make a Night's Edge map?
or
NE-WW-Canyon sucked so bad I have to show I can make
something better.
Bad Mojo and Quintin Stone
- Introduction
- Setup
- Special Actors
- NEPlayerStart
- NEMapInfo
- BlitzInfo
- NEFort
- IndustrialEspionageObjective
- EvacPoint
- Milestone
- Map qualities
Introduction
This is the first draft of a small Night's Edge mapping howto. It's
purpose is to outline the technical details required to create a Night's
Edge map as well as the qualities that the map should have to fit into the
Night's Edge universe. As the mod grows and acquires more mapping
experience, this document will grow and change.
Setup
You will need to modify your basic UnrealTournament.ini file in order to
place Night's Edge actors in your levels. Under the section titled
[Editor.EditorEngine], add these lines to the END.
EditPackages=NightsEdgeItems
EditPackages=NightsEdgeGraphics
EditPackages=NightsEdge
If you don't add these as the final lines in the section, you may encounter
errors creating maps.
Actors
NEPlayerStart:
This is the NEPlayerStart actor. This is located in the Actor browser at
Actor->NavigationPoint->PlayerStart->NEPlayerStart and is placed
just like a regular PlayerStart actor. All player spawn points need to
contain two bits of information for them to work properly in Night's Edge.
The first bit is which team the spawn point is for and the second is which
starting group for that team the spawn point is part of.
In all Night's Edge play modes, each team should have two starting
locations in a map. This keeps the two teams guessing about where the
enemy will spawn. The spawn areas should be placed far enough away so
that the area a team spawns in is likely to have a significant effect on
the team's strategy. Each starting area is a cluster of individual spawn
points for that team.
In the NEPlayerStart properties, under PlayerStart, you can set the
TeamNumber to 0 or 1 to indicate which team this spawn point is for. Under
NEPlayerStart, you can set the GroupNum variable to 0 or 1,
indicating the first or second spawn location for that team.
Personally, I find it easy to lay down many of these spawn points where
I want them. Then I select a single starting area's entire collection of
NEPlayerStart items and edit their properties all at once to make sure
they are all identical.
You need to provide several spawn points in a group when setting up a
team's spawn area. Too few spawn points mean that players will telefrag
their teammates at the beginning of a round (never a good thing). Also
remember not to make the spawn points too close together, because if the
players overlap when they spawn then you'll get telefrags again.
Any pickup Invetory actors (weapons, ammo, health, or powerups) will not
spawn in Night's Edge, since it is a purchase-based game. However, they
can be used as part of the bots' pathing network if you like. You may
find that this is the best way to motivate bots into moving around.
NEMapInfo:
Lets you customize some of the information on your Night's
Edge maps. Add one of these to your map and you can set the following
attributes:
- MapDesc - You can put in the background of your map, why the
two sides are fighting, the history that led to the conflict, that kind of
thing. You can pretty much make it as long as you want, but the longer it
is, probably the less likely people are to read it all the way through. :)
This info will be displayed in the Objective menu (default is F3).
- TeamName array - The two text areas are for you to name the two
teams. These are the names that will appear in the team menu when people
connect. It's not going to be all Razos vs CyTek anymore.
- TeamSkinList - Not used yet. If/when we get the new player
models, we will design various combinations of textures and attachments to
get different "skins" or "uniforms". This spot will let the mappers
decide which of those will be available to each side. For instance, a map
with a gang vs a corp would have corporate uniforms and security outfits
on one side, and street clothing on the other.
BlitzInfo:
This has all the attributes in NEMapInfo, plus a few extras for Blitz
playmode (Sabotage and Idustrial Espionage) maps . You won't need to have
a NEMapInfo object and this. You just need this one.
- ObjShots - Like the AssaultInfo object, lets you link in screenshots of
your objectives. When the players bring up the Objective menu,
they'll see each screenshot shown when they click on an objective.
- ObjDesc - Under the screenshot, players will see a text description of
that objective.
- NumObjShots - How many objectives are in your map.
NEFort:
The objective in the Sabotage playmode. Designed to work like a standard
FortStandard from UT's Assault.
IndustrialEspionageObjective:
Obviously, for Industrial Espionage playmode maps. In actuality, this is
similar to the FlagBase from CTF maps. When touched by a member of the
offensive team, it will spawn a special carryable objective item in their
inventory. The IndustrialEspionageObjective (IEO) can be used in one of
two ways:
- You can use it as an invisible zone that surrounds a static brush of
some kind. When offense players enter within the objective's collision
radius, they will trigger it. For example, if your objective was a
computer mainframe that the offense was trying to extract data from, you
would make the computer from a brush and place an IEO around it. The
special object spawned might then be some kind of data disk.
- You can make it a visible actor by setting various display properties
described below. If you wanted the objective to be some kind of weapon
prototype, you could select a weapon mesh to use for the IEO. The special
inventory object could then be set to use the same mesh. See below for
more information.
Here are the attributes decided on so far for the IEO:
- Advanced:
- bHidden - True if you want it invisible (option 1). When you
don't want to use a brush to represent the IEO, set this to false and you
can give it a mesh.
- Collision:
- CollisionHeight - How tall its bounding cylinder should be.
- CollisionRadius - How wide its bounding cylinger should be.
- Display: Used when you have the actor visible (option 2)
- AmbientGlow - You can give it a bit of brightness to make it
obvious.
- DrawScale - May have to resize it to look right in the world.
- DrawType - This is DT_Sprite by default. You'll need to set it
to DT_Mesh if you plan to make your IEO visible as a 3D model.
- Mesh - Go to the mesh browser to look through the 3D models
available. When you find one you want to use, click on this field and then
click the "use" button that appears beside it. That should select your
mesh.
- MultiSkins - I believe you can replace the textures used on
multi-texture objects with this array.
- Skin - If you want to pick a different skin from the mesh's
default.
- Texture - Used for sprites. If you plan to have the IEO
visible, you should use a mesh instead.
- LightColor & Lighting:
- Various light settings that you can set on the IEO if you want.
Lighting can make it more obvious to the players as to what the objective
actually is. Lighting can also be used whether the objective is visible
or not (option 1 or option 2).
- IndustrialEspionageObjective:
- bAllowMultiple - Can everyone carry one of the objectives? If
so, it will never run out, and every offense player can touch it to get
one. If this is false, only the first offense player to touch it will get
the objective. After that, it is "empty" until the defense manages to
kill the carrier and return the objective.
- bHideWhenEmpty - If bAllowMultiple is false, the IEO model will
go invisible when the objective is taken. When the defense returns the
objective, the IEO will become visible again.
- ItemName - This is the name of the inventory object that
offense players get when they touch the objective.
- PickupMessage - This is the message that offense players see
when they touch the objective.
- ShortName - This will be the name of the inventory object as it
appears in the inventory menu when carried.
- Size - Number of inventory slots the inventory object will take
up.
- Weight - Mass in kilograms of the inventory object.
- ObjectMesh - The mesh that the inventory object will use. In
the example above in option 1, where the the goal is a computer mainframe,
the mesh you use for the inventory object might be a small data disk that
the offense player has downloaded information onto. When that offense
carrier is killed, he will drop the data disk and the defense can retrive
it. In the example from option 2, where the IEO is a weapon prototype,
you would make set this attribute to the same mesh used for the IEO.
When the offense reaches the objective and touches it, the IEO will
disappear and the inventory object will spawn in the player's inventory.
If dropped, it will have the same mesh and be readily identifiable.
- ObjectSkin - The skin to use on the inventory object if a
different one is wanted.
- ObjectHeight - Height of the inventory object's bounding area.
- ObjectRadius - Width of the inventory object's bounding area.
EvacPoint:
Once a person is carrying an objective inventory object, they go here to
win the half. Shows up as a bright yellow circle.
Milestone:
The milestone actor marks the offense team's progress as they make their
way towards the objective(s). Each time a member of the team encounters a
milestone with a rating higher than their current milestone counter, their
counter is updated to the new rating (if they reach a milestone with a
lower number, nothing happens). Each map should have about 5, starting
with the milestones closest to the starting points at level 1 and the
milestones nearest the objectives at level 5. Milestones should be placed
so that they are progressively encountered along all possible routes.
If/when the offense team fails, their milestone counter determines how
much money they'll receive for their next attempt in the next round. For
each milestone reached, they'll receive money equal to the
BonusCash setting. So if the BonusCash is set to $500 and
the offense reaches 4 milestones in their first round before getting wiped
out, they'll get an extra $2000 for their second try. And milestone
bonuses are cumulative, so whatever milestones they reach in the second
round will add bonuses on top of that $2000 for the third round.
Map Qualities
Design:
There are going to be 3 playmodes in the next version. Wet Works, you're
probably familiar with. It is a team-on-team battle where players killed
stay dead until the next round begins. Sabotage involves the offense team
getting into specific area and destroying a target (kind of like many of
the Assault maps). In Industrial Espionage, the offense has to steal an
item from the defense's base or area, then return it to an "evac" spot
near or at where they started. For more details, check out the online player manual.
So first, you have to decide which one you want to try. Wet Works is the
simplest to design for. The other two involve setting up the map so that
the defensive team has a number of chokepoints it can try to hold, but not
so many that it has to spread itself too thin to cover them. That may be
the tricky part, getting the map to have just a slight defensive advantage
that the offensive team can overwhelm after enough rounds of collecting
extra cash.
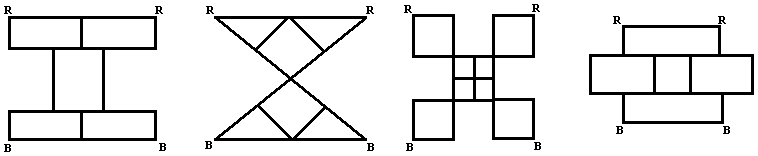
In Wet Works:
- There should not be any "ultimate" camping spots. Every possible defensive spot should be approachable from at least 2 directions.
- Teams should never be able to see each other immediately upon starting.
- Team start areas should be separate enough from each other with enough choices that players won't immediately know where they're opponents are, or where they're going.
Some examples of simplified layouts for Wet Works maps (B and R are Blue
and Red team starting areas):
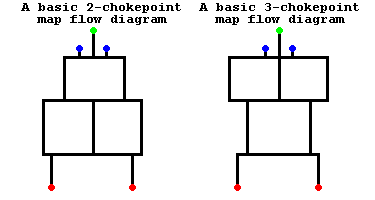
In Blitz Playmodes (Industrial Espionage, Sabotage, etc.):
- Blitz maps should have a smaller degree of complexity than non-Blitz maps, because there are specific objectives beyond just killing the other team. The defense has to have a reasonable expectation of preventing those objectives from being completed.
- Offense's two starting areas should be far enough apart that initial placement can influence strategy.
- It's not as important to place defense's starting areas apart. Generally, the defensive teams should start near the main objective.
- The entire map should center around at at least 2 and at most 4 important chokepoints. These should always be closer to the defense's starting areas than the offense's.
- Blitz maps should always be skewed to give the advantage to the defense. Defense should have superior cover and options when trying to control the main chokepoints.
- Industrial Espionage uses NEFort actors (a derivative of the StandardFort) for the target objective. The details on Industrial Espionage have not been finalized yet.
Basic Blitz map layout ideas (blue and red are starting areas, green is
objective):
In general:
- Mappers should not be afraid to make liberal use of the fog effect in UT unless it several decreases performance. The reason is twofold. 1) It is setting-appropriate, because of the apocalyptic history, and 2) it should help limit sniper-only matches, which make use of only high-powered and highly-accurate long-range weapons. In my opinion, sniper-only matches are boring and not the goal of our game, despite their appeal to some players.
- A chokepoint is a spot on the map where further movement is restricted except through a small area. This includes hallways, doorways, holes in walls, anything that prevents more than 1 or 2 people from passing through at a time, and it sometimes can stop them from moving at full speed.
- In general, maps should make use of chokepoints and supply cover for players.
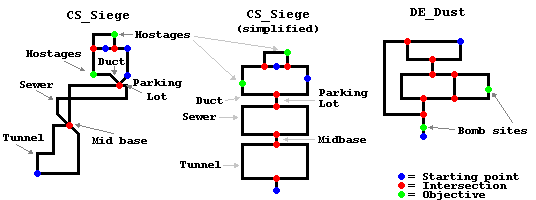
Simplified schematics of some popular Counter-Strike maps for example/reference:
Setting:
Ideas for the map itself are left up to the imagination once you decide on
the playmode. The only necessary restriction is that the level fit into
the Night's Edge setting laid out on the web site. The year is 2160, a
hundred years ago there was a global nuclear exchange, and there are few
places humans can go to be safe from radiation. The tech level, then, is
mostly what has been found or replicated from 2060, though there have been
a few advances since humanity pulled itself together. The most obvious
choices for general map setting are: a thriving uban area (such as
Arcadia), a ruined pre-war city, or somewhere in the wastes. From there,
you have a number of different possibilities. Here are some ideas:
- Shopping mall
- Downtown abandoned buildings
- Underground sewer system
- Twin highrise towers
- Large airport
- Corporate-run housing project
- Military research complex
- Bank
- Central prison
- Church
- Hospital
- Steel Refinery
- Aparment complex
- Warehouse(s)
- Pre-war museum
- Town hall
- Fusion power plant
- Water treatment center
- Bars & brothels
- Corporate compound
- Traffic tunnel (with cars for cover and maintenence passages)
- Zoo
- Amusement park
Any of these can be in-use or the ruins from before the war. Lighting
should probably be dim, unless inside a well-lit building of some kind.
Outdoor areas should have a thick cloud cover skybox to maintain the dark
atmosphere of the game. The target ideas for Blitz-mode maps probably
aren't as varied, but include such things as:
- Weapon prototype (steal or destroy)
- Map (steal or destroy)
- Engineered virus sample (steal or destroy)
- Computer system (destroy)
- Antidote to a disease or toxin (steal or destroy)
- Power distributor (destroy)
- VIP in a coma (eliminate)
- Vehicle (destroy)
- Laptop or other data device (steal or destroy)
- Secret communique (steal)
Of course, these are just a few ideas, and you're encouraged to use your
imagination. The city of Arcadia is located somewhere in the southwestern
United States (Arizona, New Mexico, Nevada). For those making wilderness
maps just outside Arcadia, searching for scenic pictures of these states
might help out. (For example, see this
page, or this one,
or this one)
Mapping Resources